Showing posts with label Simulations of Naval Warfare. Show all posts

Saturday, December 25, 2010

Harpoon 3 ANW - Fighting the Wrong Battle with the Wrong Warships - Part 3

This is a continuation from a previous entry and the battle narrative with the most anticlimactic end I ever told ... And not because of my lousy writing or command skills!

This is where we left previously: I detached a total of four warships from TF02 and TF01 and ordered them west to intercept the Argentine carrier Veiniticinco de Mayo and its escorts. The new task force (TF08) is composed of HMS Amazon, HMS Battleaxe, HMS Argyll (all purpose frigates) and HMS Glasgow (area air defense destroyer).


The modest task force (westmost blue concentric circles icon in the middle of the screen) is sailing west to meet the Argentine carrier group (yellow squarish icons in the west). The selected unit ( blue concentric inverted semicircle) is a flight of 3 Harriers investigating and air contact. Their CAP waypoints are the green "X"s. The area inside the orange lines is a "threat to aircraft" I placed to avoid my own aircraft flying too close to the Argentine ships.

Time is 0105 now. TF08 is sailing at flank speed towards the Argentine carrier. It will be at least two hours until TF08 gets withing weapons range. The Sea Harriers CAP mission downed at least 7 Argentine aircrafts. Things are looking good so far.
Task force formation for scared admirals: because of the high threat of Argentine aircraft and warships, TF08 sails in a tight formation where almost every single weapon system from every warship can support each other. The green outer circle represents a range of 10 nm. Warships of TF08 are represented by blue circular icons.

Time is now 0223. TF08 is getting close to the Argentine carrier. On the left panel, TF08's tight formation makes it very difficult to pinpoint the exact location of the Argentine warships. Sensors need to be more widely spread to pinpoint surface contacts effectively, but I am more concerned about mutual support right now. On the right panel, a hiatus in the CAP missions has left TF08 exposed to Argentine aircraft. The inverted yellow half-square in the right panel turned out to be a 2-aircraft flight of A-4s which was shot down at close range.
Time is now 0245. TF08 receives the first timid missile strike from the Argentines. In the bottom right panel, an Argentine anti-ship missile (red M icon) is about to be intercepted by one of ours. In the top right panel, note how I messed up the CAP missions and ended up with single aircrafts flying west. Thankfully, the Argentines have suffered tremendous air losses in the past two hours and the single Sea Harrier was brought back to safety.
After some maneuvering complications TF08 (blue concentric circular icons) fires its first anti-ship missile. Time is 0354. TF08 has issues tracking the Argentine warships, now located at an estimated range of less than 30 nm. Three single anti-surface missiles fail to guide. We need to close even more.

0439, ARA Hercules (Type 42 Destroyer, labeled as contact D044) fires a barrage of missiles. Although it was a  nerve-wrecking experience, TF08 manages to shoot down all of them. The Argentine carrier Veinticinco de Mayo is the northmost surface contact (yellow square). TF08 continues to fire salvos of 2-4 missiles onto the carrier, but no hits are confirmed.

0503. The Argentine escorts (two yellow squares plus the red romboid icons sailing southeast) leave the Veinticinco de Mayo (yellow square icon near the TF08) behind. The Veinticinco de Mayo is evidently damaged and immobile as we approach for the final kill.
0510. The Veinticinco de Mayo (red romboid icon near TF08) is within sight of TF08 and on fire. TF08 engages the carrier  with its good ole Bofors naval guns. 
And then Harpoon 3 crashed to desktop! No warning, not even a "this program has encountered a problem and needs to close" message. Just the sound of my voice calling expletives. Sudden death ...

The most interesting part of the battle was to come. I had my doubts about how much damage TF08 could do to the Argentine Navy, but I underestimated these four warships. I wonder how the rest of the battle would have unfolded. Was it a good idea to detach warships from the main body of the British force?

Lessons learned:
-Save, save and then save some more. It is my first crash in Harpoon 3, but it is better to be safe than sorry
-A close formation is good for mutual support (we defeated a lot of Argentine missile salvos and air attacks), but terrible for tracking enemy warships
-Air cover:  have a solid plan to avoid gaps in the patrols
-Once you know that an enemy warship is no longer combat-capable, move towards other threats. I focused too much on the Veinticinco de Mayo and I should have started to move onto the escorts as soon as I saw the Argentine carrier lagging behind them


Cheers,

Monday, December 13, 2010

Harpoon 3 ANW - Fighting the Wrong Battle with the Wrong Warships - Part 2

This is a continuation from this previous entry.


2140, May 15 1995. The green outlines of the Malvinas/Falklands and the continent are spectators to the naval battle to come. The red square icon is Port Stanley. The blue concentric circles are my task forces. From south to north TF02, TF01 and TF06. West of TF01 a Lynx helicopter (blue inverted semicircle with two small "ears") has detected some surface contacts (yellow squares) and considerable air activity (yellow inverted half-squares). One air contact (the one selected) is a fast mover (note its airspeed at 420 knots) and considering its location and bearing (far from land masses) it is possibly coming from the Veinticinco de Mayo. The two surface contacts northwest of TF01 are a bit worrying too, but so far we haven't observed any aircraft in their proximity. They may well be patrol boats. The HMS Trafalgar (blue inverted semi-circle) is west off Port Stanley.
A lone Lynx helicopter scouting some 90 nm west of the main body of our task force has reported surface contacts along with considerable air activity. These contact reports reek with the smell of the Argentine carrier Veinticinco de Mayo.

Information. How many battles lost for the lack of it? Is this the Argentine carrier and its escorts? Is it heading towards the islands? Or is it actually seeking battle with our carrier?

Decision. Is "always attack" such a strong dictum in naval warfare? Should I engage the contacts in a full-blown carrier vs carrier naval engagement? Should I just track the Argentines and relay that information to the Trafalgar for an ambush?

I settle for a small raid (AKA half-ass attack) on the Argentines. I detach a total of four warships from TF02 and TF01 and order them to a rendezvous point near their former formations. HMS Amazon, HMS Battleaxe and HMS Argyll (all purpose frigates) and HMS Glasgow (area air defense destroyer) quickly get into position and find their way west. I have divested my carrier and land assault task forces of a significant amount of firepower, but I need to know what the Argentines are up to and stop them from getting close to the islands or my carrier, preferably all at the same time.

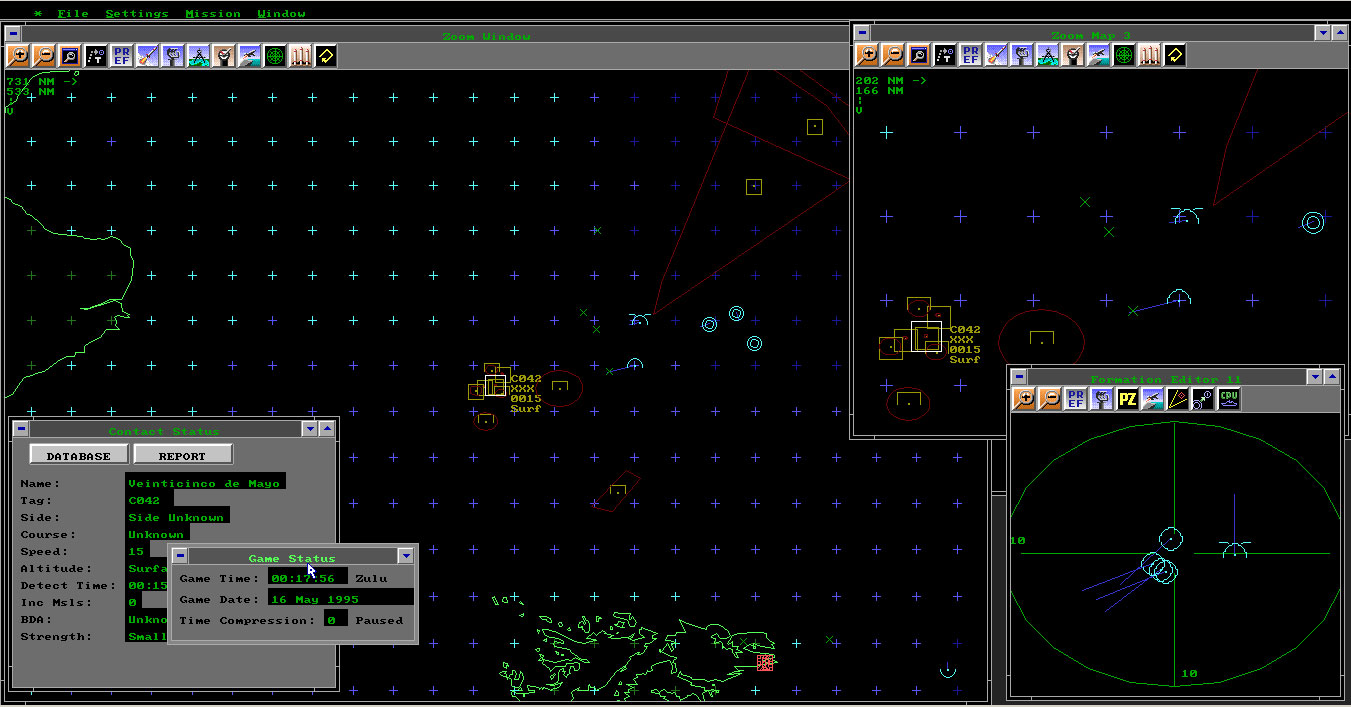
This is a complicated screenshot and I strongly suggest clicking on it for a better view. The big map in the background ("Zoom Window") shows the big picture tactical situation. The bunched up yellow icons in the center are the surface and air contacts we have detected. Some 60 miles east of these contacts, the inverted blue semicircle is a Harrier conducting a quick scouting mission. The lone Lynx helicopter (blue inverted semicircle north of the Harrier) is still providing intelligence to our fleet. Immediately east of the Lynx helicopter, the blue concentric circles is the new mini-task force, sailing west from the two other blue concentric circles (TF01 and TF02). An expanded view of the mini-task force's formation is in the window located in the lower right part of the screenshot.
Weak everywhere and with more moving parts, my fleet is committed to a tactical plan with a flexibility that has an expiration date of one or two hours. Once the raiding formation sails 30 or 40 nm from the main body of the fleet, it will take them no less than 1 hour to get back in the event of a major Argentine attack. One likes to think that only once you get into shooting distance to the enemy is when the arms of battle won't let you out of their grip. In naval warfare, the vastness of the sea swallows your firepower and your tactical options very easily.

On the bright side, the raiders sailing west to meet the Veinticinco the Mayo need air cover from our Harrier aircraft.I set flights of 3 Harriers into CAP missions just in front of the mini-task force. Unintentionally, these CAP missions ended up chewing up a big chunk of the Argentine naval aviation assets.

The selected unit (blue concentric inverted semicircle) is a flight of 3 Harriers investigating and air contact. Their CAP waypoints are the green "X"s. The area inside the orange lines is a "threat to aircraft" I placed to avoid my own aircraft flying too close to the Argentine ships.
To be continued ...

Cheers,

Saturday, May 29, 2010

One Trip to the Attic ... And There Goes the Afternoon!

The list of overdue blog entries is not getting any smaller. This noon I went into the attic to recover some game manual and found my CDs of Sonalyst's Naval Combat Pack. I forgot about it almost by the time I bought it, quite a while ago.

Two British Harriers (0027 and 0024) fend off a couple of Argentine Mirage IIIs under the attentive watch of HMS Beaver. It's a long sail to the Malvinas/Falklands ...

Spent the afternoon playing this thing. Gah! Gotta focus ...

Cheers,

Thursday, May 20, 2010

Keeping my fleet afloat

The naval branch of the blog sails through the seas of conflict ... at creep speed! :)

Still haven't completed the tutorials of Harpoon 3 Advanced Naval Warfare. So many great games to play, so little time!

Tutorial #4. I'm in command of a US frigate (blue circle). A Russian bomber passes by (red symbol). Are we going to shoot it down or what?

The main screen of H3ANW. The expanded map on the left shows some bogies coming down to us (yellow icons that look like half-squares).

On a serious note, I'm coping with some serious paradigm shifts because of my land-based warfare baggage.

Sure, some principles of warfare are almost universal. But changing the virtual smell of mud to the one of salt water is quite a thing for me. Oops! Slash that part of the smell of salt water, most of the warships I will be taking into battle are not commanded from the top of a bridge but rather in a command room buried inside the guts of these colossal beasts of steel. So, it will be the smell of sweat and stale coffee!

As opposed to land-based operations, in naval warfare there is no river to cross, no hill to be taken, no forest to conceal your troops. Yet, the seas are so big that finding the enemy is not a trivial task.

Looking forward to my first engagement!

Cheers,

Friday, April 30, 2010

The Red Pill Gives You Wings!

Like the famous energy drink ... :)


A new wave of screenshots and a vignette of what The Red Pill can do are now available at WarfareSims.com.

This time, a JSTAR platform flying along the Saudi border finds a group of enemy tanks and an SA-6 battery. A SEAD flight (F-4Gs) and an AI mission (A-10s) take care of them.


There is war gaming goodness wherever you look at! If you read the original post at WarfareSims.com you will notice the extreme detail in the modeling of sensors. There is even mention of secondary explosions taking out some of the SA-6 launchers (!).

I wonder if there is any type of modelling of neutral vehicles. I bet that at that distance the JSTAR may detect Baghdad's rush hour traffic.

Cheers,

Sunday, March 28, 2010

The Red Pill Goes Nuclear!

Man, the team developing  The Red Pill has released a new game play story. A nuclear striker on the Kola peninsula! Getting better and better, guys. Looking forward for this simulaiton.

The white circles are the shock waves from the tactical nukes.

Please take a look at the full story here. Plenty of new screenshots!

Cheers,

Wednesday, February 24, 2010

Exclusive Interview with The Red Pill's Dimitris Dranidis

The Red Pill (working title) is a naval/air simulation/war game being developed by a team of independent developers. As judged by the screenshots and after action reports posted at WarfareSims.com, The Red Pill  will be packed with realism and playability. This is an interview with one of the team members, Dimitris V. Dranidis. 


Tuesday, February 16, 2010

Red Pill: New Screenshots


WarfareSims.com has a new batch of screenshots of the "Cans Only" scenario. This naval/air war game looks absolutely fantastic and judging by the screenshots where info windows are open there appears to be an excellent engine under the hood. Read the full story and see all the screenshots here.

Cheers,

Monday, February 1, 2010

New "Red Pill" Screenshots

Ladies and gentlemen, this naval/air war game will kick some serious ass. A new batch of screenshots has been posted this weekend at Warfaresims.com.

The stunning screenshots are the first batch from an scenario named "Cans Only".

This is a simple ASuW-centered scenario addressing a hypothetical surface engagement exercise in the western Pacific in the summer of 2010. Two USN surface action groups, one of them including the amphibious ship USS Essex, must reach the Tokyo-Yukosuka area. Two JMSDF taskgroups act as OPFOR and must prevent them from doing so. There is no land-based air support or submarines; both sides must make do with their surface ships and what they can carry onboard. The Japanese have an advantage in numbers, but the US has more Aegis ships and lots more helicopters. The setup is 2-on-2 groups so there are plenty of decisions to make!

More details and screenshots here.

Cheers,

Saturday, January 30, 2010

Tank-Infantry Teams in ARMA2: Real Life Hazards and Annoyances We Don''t Have to Worry About


Continuing with tank-infantry teams, I will briefly mention some of the hazards and struggles real life US Marine rifle men have to cope with while working with tanks.

  • Communications. As a real life USMC platoon/squad leader, if you get a tank platoon or section assigned to you, it means these armored behemoths are your subordinates now. Commanding them is not easy. Most of the times the tanks and the infantry will be in different radio communication networks. If you are lucky the tank will be equipped with infantry intercoms (a small telephone in the back of the tank, pretty much like the ones used during WWII). 
  • Sitting around the feet of giants. The tank crews' situational awareness of the environment immediately close to their buttoned up tank is extremely low. Real life Marines are taught to always assume that tank crews can't see them:
    • Stay at a safe distance, close to things the tank will avoid (like a building)
    • Never stay between two tanks
    • Watch out for moving turrets
    • Watch out for the extreme heat coming out from the exhaust grid in the back of the tank
    • Never walk in front of a tank without permission
    • Never go prone near a tank
  • Tanks' main guns are dangerous even when they are not aiming at you. Tank commanders will always signal the Marines on foot that they are about to fire the main gun (actually even the coaxial gun). This signal can be by radio or a hand signal.
    • The main gun of a tank generates a lot of overpressure. The infantry commander is responsible of keeping his Marines out of the blast radius. Watch out for broken glass and debris caused by the overpressure.
    • Separated SABOTs from the armour-piercing fin-stabilized discarding sabot munition can kill infantry located in front of the tank. Never fire main gun rounds over the heads of infantry.

In ARMA 2 we get it easy. In ARMA 2, your communications with the tank team are instantaneous and 100% reliable. AI tankers in ARMA 2 do a more than decent job in moving around infantry (though accidents will happen sometimes in the virtual battlefield, so be careful). And you can sit right by a virtual M1 tank in ARMA 2 while it fires its main gun, with the only consequence being a small ringing in your virtual ears. That beats spitting out your lungs in pieces ...

The Marine in the middle of the road is risking getting struck if the tank reverses suddenly. 

Never walk in front of a tank without permission. 

Cheers,

Friday, January 15, 2010

More "Red Pill" Screenshots


The team developing "Red Pill" has released two more screenshots and more details about this air/naval  war game.

From Warfaresims.com:
Here we see how a single A. Burke-class destroyer positioned in the Arabian Sea is able to threaten a wide range of Iranian targets with its Tomahawk cruise missiles (dark red range ring). The map view is deliberately zoomed out to display the globe.

Tuesday, January 5, 2010

"Red Pill", First Screenshots!


"Red Pill" is a naval-air war game currently in development by a team of very talented enthusiasts. The details of the game are scarce but think "Harpoon on steroids". Today they made public the first screenshots of the game. Read the full story and see all the screenshots at Warfaresims.com.  Looking good!
Cheers,
EDIT: Image above courtesy of Warfaresims.com.

Saturday, December 5, 2009

The Blog goes Naval ... Sinks Shortly Thereafter


Naval warfare was for me one of those "maybe later" topics. Not for lack of interest but actually for lack of time. In particular, the complex, high tech nature of modern naval warfare always fascinated me. So, this week I decided to get "Larry Bond's Harpoon: Advanced Naval Warfare" from Matrix Games and finally get into the virtual seas.